Monday, 27 January 2014

The Major Project: Post Production Proposal

As I chose to do extend my project into a year-long one, both the Minor and the Major project are involved in producing the final result. Since the minor project was based on pre-production assets such as props and the characters, post-production will involve creating the sets that my characters will inhabit, finishing off the rest of the props and any special effects I will need during the animation.

The primary focus here is the epmhasis on animation as the whole project itself is an animated trailer. If I don't give the animation the justification it deserves, it could end up ruining the entire trailer. This is why I've previously taken to looking at examples of animation styles and how I would apply those to my characters. There is a particularly notable animation style that I would like my charaters to portray. These examples can be found in these videos.


As a fan of both Riot and Blizzard's cinematic departments and their art styles, I thought that these animation styles would be perfect. As one might see from these videos, I do not want to aim for hyper-realistic movements. Instead, I would think that unrealistic, exaggurated and swift movements would better suit the stylized appearence of my characters. The style also spills over to the lip-syncing as best portrayed in Blizzard's 'Siege of Orgrimmar' trailer. The enunciations and lip movements are greatly magnified with each word. That's also what I want to likewise do with my lipsyncing.

However, in order to animate, I need to finish everything else such as the sets, lighting, effects and any other bits I may need to do before animating. This is why I have created a time-table of sorts to adhere to. I may make changes along the way, so it isn't final.

27th - 2nd
Model Sets

3rd - 9th
Layout UVs for Sets

10th - 16th
Texture Sets

17th - 23rd
Additional Time reserved for Sets

24th - 9th
Create Any Additional Props Needed
Create Lighting for Scenes.

9th - 12th
Animating
Special Effects

13th -  27th
Rendering

28th - 4th
Editing

Tuesday, 7 January 2014

Character turnarounds!

Hello once again to everyone. I hope that you all had a happy Christmas and a merry new year and everything in between. I realize that I haven't posted anything since the 19th, which is my fault. I've been engrossed in trying to get these turnarounds rendered and completed; lots of waiting around for renders and file-loading to finish. Thankfully, after many frustrations, they're finished.


Thursday, 19 December 2013

Soldier Rig


 Here's the soldier rig. It's pretty much the same as the civilian's but with a different model attached. Most of the work that was done for this rig was either getting the armor to move right on the body when he moves, applying, skinning and copying weights over from the civilian weight source or creating his prop rifle.


 Here's his rifle. I used reference from modern military rifles and futuristic-looking rifles in order to get a mix that would look near-futuresque. The trigger is controllable with attributes in the box control surrounding it.


Posed Render


Wednesday, 18 December 2013

Civilian Rig

 Here's my civilian rig. Not many unique features, unfortunately. He pretty much uses the standard rig that I'm using for the rest of my characters. Thankfully I'll probably be able to use this very same rig and bind the soldierto it as well, since they're ultimately derived from the same model.


Sunday, 15 December 2013

Issac's New Rig! (3 down, 1 to go)

To those of you who have been following along with my progress on these rigs, I'm sure you know the drill by now. Same basic rig as Fat Cat and Kat for consistency reasons, but with a few unique attributes. I'll run through the parts of Issac's rig that differentiates it from the previous two.


Because the Issac model has goggles instead of real eyes, there wasn't a need to create brow rivets or create joints for the eyelids to blink. Instead, only a look control was needed. I wanted to have an attribute in the controller which would enable the eyes to spin around, but I was unable to find a way to do so without the eye rotation on the Eye Look controller locking up in the Y rotation axis.


Volume preservation also works!


The harness seemed a little daunting to rig at first, but after remembering some techniques learned from the online tutorials, it became relatively clear and simple. There were, still, some issues with grouping this into the main rig that proved a pain to resolve, however.


Posed Render


Wednesday, 11 December 2013

Fat Cat's New Rig!

 Here's Fat Cat fully rigged and skinned!

 I think I'm starting to get the hang of rigging now. Call me masochistic, but it's actually growing on me. Dare I say that I find it fun?

In order to remain consistant, I pretty much used the same setup as Kat, albiet a modified setup to conform to Fat Cat's build and unique features.


 The ribbon spine is still in use here, too.


 The cybernetic eye was particularly fun to rig. However, despite it's complicated appearence, there weren't many moving parts to work with. I also added control visibility options to the face and the entire body.


I also added an outfit visibility option to reduce frames-per-second lag when animating, much like Kat's outfit switches.


 Following Alan's tutorials as carefully as possible, a lesson learned after trying to mess about with Kat's IK/FK arm switches, I managed to give this rig a similar set of switches.


 Despite Fat Cat's cybernetic eye, rigging his asymmetrical eyes up to a look control wasn't that much different from rigging regular eyes.


 Standard IK leg controls, as well as a standard tail control options embedded within the hip control.


 Show 'em some emotion!


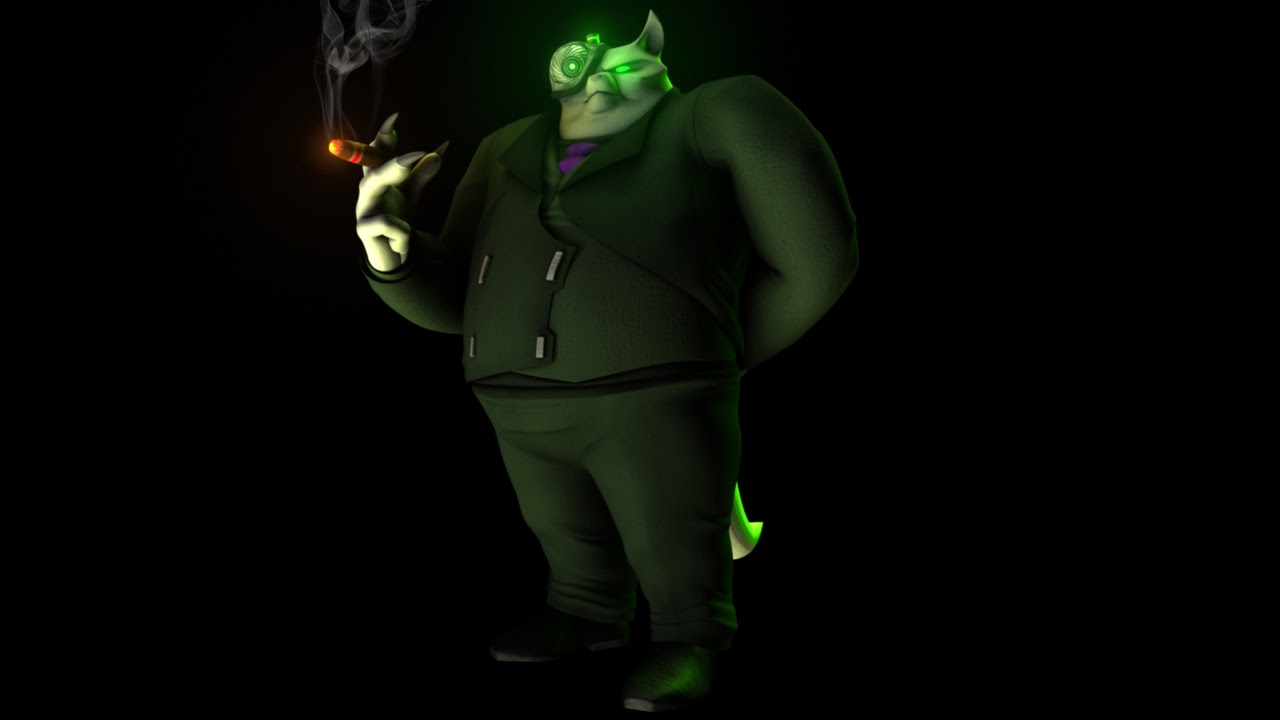
 -and of course, the obligatory rendered pose using his new rig. I created the cigar especially for this pose. The smoke was added in photoshop.


Sunday, 8 December 2013

Kat Rig: Finished! (Almost)


 So here she is! Pretty much finished in terms of rigging. I just need to fine-tune a few things such as creating an IK/FK switch for the arms and a bit of tweaking with the spine. I will have to ask how to do those, particularly the switch; I've tried to follow the tutorials on the blog, but it always turns out so messy.


Alan suggested that i use a ribbon spine, which would help a lot with all the dynamic movement that Kat would be doing during the trailer.I have to admit, I'm growing fond of this kind of spine!


 Instead of using blend shapes, i decided to use the riveting technique that Alan introduced me to during the Adaptation project. Riveting gives me a lot more control over the facial expressions and the lip movement. It'sespecially effective during lipsyncing when I can make slight adjustments to the lip shapes when pronouncing an exaggerated word.


 Rivetting also helped me create custom improvized 'blend shapes' with the hood and skirt, enabling me to open and close the skirt and bring the hood up and down over Kat's head.


I also managed to create a channel attribute which enables me to adjust the level of glow on her eyes when Kat 'powers up' as seen in the animatic.


 More custom channels controlling the ears and the hair.


 Standard leg and foot rig.


 I created an outfit switch in the main control which enables me to toggle the visibility of her bandage outfit and her superhero suit, as well as the visibility of her body.


Like I said, there are still a couple of issues to fix...


 Posed and ready to kick some arse!


Thursday, 5 December 2013

Kat Rig: Progress update!

Here's my progress on the rig so far. She's skinned and her arms and legs are rigged. It was a fairly merticulous process, a process which drove me well into the early hours of the morning, but I think I'm getting the hang of it. I found that Alan's tutorials helped a lot as a guide. Also, looking through Ethan's blog and the processes he used to create his rig has also given me a few ideas.


 This part of the skinning--the hips-to-thigh connection--was particularly fiddley to pull off.
When rigging, I also created crosshair controls infront of the knees and behind her elbows which control the FK/IK switching.


 The fingers were also a pain. It always seems to be when the geometry folds in on itself around joints that things get complicated during skinning.


Wednesday, 4 December 2013

Kat Rig WIP1


Jackie put me in contact with Ethan Shilling, a post-graduate student renowned for creating complex and advanced rigs. I talked with him about the problems I might face when creating five rigs for five characters by January and he suggested that I rig only what's neccesarry, which makes sense.

For instance, Issac and Fat Cat most likely won't be needing any rigging on their legs since they never move them during the whole trailer. I will only be needing to fully rig the civilian and Kat it looks like, since the Shock Trooper model was based on the civilian model and will most likely not need a drastically different rig.

When making these rigs, I will also attempt to follow more advanced rigging tutorials online as well as the CG blog tutorials, taking parts from here and there; I would very much like to learn to create my own customized and personalized rigs.

Anyways, it looks like I'm in for the long haul over the next few weeks creating these rigs. I await a habit of sleepless nights and coffee drinking.